A Kitchen To Smile About
- Jan 20, 2021
- 7 min read

A very happy new year to you! Can I still say that in mid-January? Well, seeing as this is my first blog post for 2021, it seemed only fitting to start that way. 2020 was a year none of us will forget in a hurry that’s for sure. Filled with difficulty, loss and pain for so many, yet strangely, it brought many positives for us as a family. I think we definitely learned to appreciate each other more, and along with it the simpler things in life. Getting out for walks, having more. time to really appreciate the nature around us, enjoying garden. How about you? How would you sum up your 2020?
Kicking off my first blog post of the year, I want to ask you a question. Is there a room in your home, which more than any other irks you? You know, the one which makes you want to turn around and leave it as soon as you’ve walked in?
Well for me, the worst offender is, or should I say was our kitchen. Badly planned by the developer of our house, with ugly laminate units, it’s always been a space I’ve itched to change. Not ideal when you have to spend a considerable amount of time in it. But, for some reason or other, for the past twelve years of living here, we’ve just put up and done nothing about it. Possibly because we never envisaged this being our forever home, partly because in an ideal, ‘money no object’ kind of a world, we’d rip it out and start again!! But truth be told mainly through procrastination as to what on earth to do with it!

Then Lockdown 2.0 happened. Which handily coincided with the midterm break, a week’s holiday booked, in which we couldn’t go anywhere or do much with. In a throw-away comment I said, “Maybe we should use the time to finally get around to giving the kitchen that facelift”, which, to my surprise Gavin said, “yes, let’s do it”! So, with little time to waste I had to come up with my design and project plan!
Now I don’t know about you, but I have a fairly hefty Kitchen inspiration mood board on Pinterest, chock full of dream kitchens for my mythical dream home. My task was to try and apply some of what makes these kitchens so special, in my less than dream space, on an almost zero budget. No pressure then.
So, to access the situation: I hated the ugly, flat fronted laminate units doors, with their even uglier grab-rail style handles so they had to go. I can’t say I loved the faux granite work tops, but costly to replace and still in excellent condition they needed to remain. The sink similar. I liked the idea of incorporating open shelving, so the wall unit nearest the cooker could be replaced and shelving added instead.
Armed with this, I referred back to my Pinterest board and one style more than any other leapt out at me. And it was this stunning small space kitchen remodel by Devol Kitchens, one of my favourite brands for truly swoon-worthy kitchen spaces.


https://www.devolkitchens.co.uk/blog/photographing-a-little-green-devol-kitchen-in-paddington images from their website...
The green used here was similar enough to our existing wall colour, which Stillorgan Décor laughingly refer to as ReTwiggd Green. The interior designer Abigail Ahern often talks about the power of painting your storage a similar colour to your walls, making a small space feel larger, and this kitchen certainly highlights that. So, decision made, dark green units all the way! We already had a pot of the same shade of green paint we'd used on our walls - a Mylands of London colour from their 900 colours collection (Colour code AGY23), when we redecorated.
So that was colour sorted, but how to go about getting the shaker doors of my dream kitchen without replacing them. We needed to remove the laminate coating on the doors as our starting point, as in some places it was beginning to peel. This is where YouTube came in very handy! ‘How to remove the laminate coating from kitchen cupboard doors’ was the term I put into Google and several videos popped up! One brilliant chap’s video made it look so simple and also SO satisfying, by simply using a hairdryer!!!!!! I was sold!
Watch here to see what I mean:
With the laminate removed, the next hurdle to jump would be to make them into shaker doors. Cue another YouTube video, again which made it look pretty easy. The trick was to use wooden strips cut to size and attached to the doors to form the shaker shape. How hard could it be! Mr ReTwiggd is pretty handy with the power tools, so between us this should be child’s play. Or at least that was the theory!
Watch how to make a shaker door here:
Armed with a design and our project plan, we set to work on a wet Saturday at the start of the week off, figuring we'd be done by mid week. Hairdryer and an artist’s palette knife, or as it jokingly became known, the ‘thermo-plastic scraping tool’, at the ready…


Taking off the laminate to reveal the. MDF underneath..
As you can see, the man on YouTube was quite right, it does come off pretty easily and by the end of the afternoon, we had stripped that nasty plastic coating right off the doors and draws, revealing the MDF underneath. Note to self ‘never buy a laminate kitchen, no matter how hard wearing they may be’, we felt pretty terrible about all the plastic waste from them.
Now on to the shaker battening, a whole other kettle of fish entirely. We drew a rough impression in pencil on the doors as to the size of the strip we thought would work and sourced the wooden strips from Woodies, for around €100 all-in, including wood filler etc. The tricky part was attaching the batons. All the MDF doors were in excellent condition, however they had a slight curved edge which made attaching the flat wood strips tricky. The pieces were cut to size, glued and then nailed in place. The nice girl from the youtube video we watched, had a lovely workshop with a nail gun and of course flat doors to work with, which is what had made it all look so easy. We had none of these things, so to say it was a challenge would be accurate!


By the time all the doors were done, poor Gavin had lost several finger-ends to the hammer blow and had uttered enough curse words to send him straight to hell! Then of course was the job of filling in all the resulting gaps with wood filler, sanding them back until smooth when dry. A pretty monumental task, especially when your wife is a perfectionist and wants no rough edges whatsoever.
While all that was being done, I tackled the process of washing, sanding, rewashing, priming, then painting all the carcasses and kick-boards (with a little help from my young assistant). We removed some pointless trimming from the top units and from the work tops, making good the walls, which also instantly made another difference and updated the look.


The weather took a turn as the week progressed and our plan to paint all the doors outside in a factory line had to be rethought. They were primed using a spray-painting machine, but with a few accidents, we felt hand painting with a roller was the safest option for guaranteeing a smooth finish. Thank goodness then for the brilliant team at Butler and Dunne, who regularly send me Two Fussy Blokes paint rollers, easily the best I’ve used. They, coupled with the beautiful quality of the Mylands of London paint, definitely made the difference and it was exciting starting to see the vision taking shape. Thankfully a drier day allowed us to finish getting the last of the three coats of paint on and with the doors fully dry, we set about rehanging them.


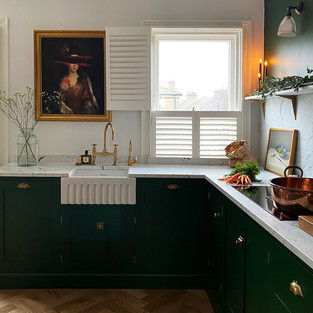
I can’t tell you how exciting it was. Seeing them in all their gorgeous green glory made me a little teary-eyed! Finally, the makings of a kitchen to be proud of! New brushed brass handles sourced from Amazon were added (a fiddly job but that’s another story). The kitchen island, was given a light sand and repainted in graphite black to contrast against the green and break up the line.


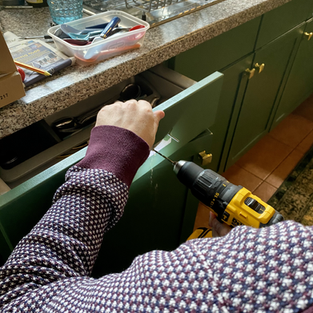
A plan coming together... the units with the doors going. back on.
To continue with the brass look, I spray painted some storage jar lids and a wall spotlight, to match, styling the space with all favourite vintage kitchenalia and an Old Master’s style vintage framed print (the creepy boy as the kids have nicknamed him). As for the open shelving, for now, we have kept the original cupboard carcass to the left of the cooker, simply removing the doors to expose the shelves. The plan had been to remove it altogether but with cost implications etc, we have decided to keep it for now and paint it to make it blend in, a job still on the snag list.


Adding the new handles and those upcycled brass touches..
What did we learn from the project:
*Youtube video tutorials are brilliant, but don’t always believe in reality, how simple they will make a task look?
*Mylands of London paint for wood and metal is a dream to work with, and offers exceptional coverage. A 1 litre tin, plus the dregs of a previously opened can was enough to do the whole space!
*Kitchen makeovers will test your relationship, but what doesn’t kill you makes you stronger!
*If you think a project will take you a couple of days, triple it!
*Adding straight battening to rounded edged doors is a total nightmare, but so worth the perseverance!
*The whole project cost us less than €200, admittedly made cheaper as we already had been given the paint as part of a competition win.
*Above all though, we wondered why we hadn't done it sooner!

So, what are you waiting for! If that room is still irking you, now is as good a time as any to do something about it. Do let me know if this has inspired you to give your own kitchen space a makeover. Oh, and of course if my colour and styling services can help you turn a room from irksome to awesome! 😉
Sarah 💚


A huge thank you to Stillorgan Décor - https://stillorgandecor.ie
Mylands of London - https://www.mylands.com/
Butler and Dunne Two Fussy Blokes rollers https://www.instagram.com/butleranddunne/?hl=en
https://twofussyblokes.com/
Comments